To tie a rope ladder, follow these steps: loop a rope through two parallel rungs, tie a knot below each rung, and repeat until the ladder reaches the desired length. A rope ladder is a versatile tool that can be useful in various situations, such as camping, emergencies, or even for kids to play on.
Knowing how to tie a rope ladder is a valuable skill that can come in handy when you need to climb up or down a structure where a traditional ladder is not available or practical. Tying a rope ladder is a simple process that requires only a few basic steps.
I will guide you step by step on how to tie a rope ladder most easily and efficiently. So, let’s get started and learn how to make a sturdy and reliable rope ladder.
How To Tie A Rope Ladder: Materials And Preparations
Tying a rope ladder requires the right materials and proper preparations. In this section, I will guide you through choosing the right type of rope and selecting the appropriate ladder rung material. By following these steps, you will ensure a sturdy and reliable rope ladder that can be used for various purposes.
Choose The Right Type Of Rope
When it comes to tying a rope ladder, selecting the right type of rope is crucial for its strength and durability. Here are some factors to consider:
- Strength: The rope should have a high tensile strength to support the weight and pressure it will bear when climbing the ladder.
- Material: Synthetic ropes like nylon or polyester are commonly used for their durability and resistance to weather conditions.
- Diameter: The rope’s diameter should be suitable for the ladder rungs to ensure a secure fit. A thicker rope tends to be more comfortable to hold.
- Length: Determine the desired length of the ladder, and ensure the rope is long enough to accommodate it.
By considering these factors, you can confidently choose the right type of rope for your rope ladder.
Select The Appropriate Ladder Rung Material
The ladder rungs contribute significantly to the ladder’s stability and comfort. Here are some options to consider:
| Ladder Rung Material | Advantages |
|---|---|
| Wood | Provides a natural and comfortable grip, widely available, and can be easily shaped and customized. |
| Metal | Durable and resistant to weather conditions, suitable for heavy-duty applications. |
| Plastic | Lightweight, affordable, and resistant to corrosion, making it suitable for outdoor use. |
Depending on your preference and specific requirements, you can choose the ladder rung material that best suits your needs. Ensure that the ladder rungs are appropriately spaced and securely attached to the rope.
Once you have selected the right type of rope and ladder rung material, you are ready to move on to the next step: tying the rope ladder itself.
Measuring And Cutting The Rope
Before you can start tying a rope ladder, it is important to measure and cut the rope to the desired length. This step is crucial to ensure that your ladder fits perfectly and meets your needs. In this guide, we’ll walk you through the process of measuring and cutting the rope for your ladder in a few simple steps.
Measure And Mark The Desired Ladder Length
The first step is to determine the length of your rope ladder. To do this, you’ll need to consider the height you want to reach and the space available for the ladder. Measure the distance from the starting point to the end point where you want your ladder to reach. Once you have the measurement, add a few extra feet to account for tying knots and securing the ladder.
Next, mark the desired length on the rope using a permanent marker or a piece of tape. This will serve as your guideline when cutting the rope into separate segments for the ladder rungs.
Cut The Rope Into Equal Segments Based On The Number Of Ladder Rungs Required
Now that you have marked the desired ladder length, it’s time to cut the rope into equal segments to create the rungs. The number of segments you’ll need depends on the number of ladder rungs you want.
To maintain consistency, it is important to cut the rope into equal segments. Use a sharp knife or scissors to make clean cuts at the markings you’ve made earlier. Make sure that each segment is of the same length to ensure a uniform ladder.
Note: The length of each segment will depend on your personal preference and the spacing you want between each rung. It’s a good idea to refer to standard ladder measurements if you’re unsure about the ideal spacing.
After cutting the rope into equal segments, you can proceed to the next step of actually tying the ladder rungs.
Creating The Ladder Rungs
Now that you have determined the distance between each ladder rung, it’s time to start creating them. This step is crucial as it forms the foundation of your rope ladder. By following these steps, you will be able to tie secure knots to make ladder rungs using the cut rope segments.
Determine The Distance Between Each Ladder Rung
Before diving into the tying process, it’s essential to determine the distance between each ladder rung. This step ensures that your ladder will be safe and comfortable to climb. To determine this distance, measure the desired height of your ladder and divide it by the number of rungs you want.
For example, if you want your ladder to be 8 feet tall with 8 rungs, each rung should be placed approximately 1 foot apart from one another. This measurement ensures that users can climb the ladder with ease and have a stable grip at each rung.
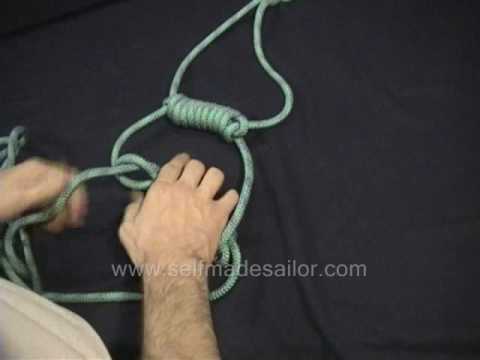
Tie Secure Knots To Make Ladder Rungs Using The Cut Rope Segments
Now that you have determined the distance between each ladder rung, it’s time to tie the knots and create the ladder rungs. Follow these steps to ensure a secure and durable ladder:
- Cut rope segments that are long enough to wrap around the main side ropes and have substantial lengths for the rungs.
- Take one rope segment and fold it in half to create a loop.
- Place the looped rope segment against the main side ropes.
- Take the two loose ends of the rope segment and pass them through the loop, creating a basic knot against the main side ropes.
- Pull the loose ends tightly to secure the knot and create the first ladder rung.
- Repeat this process, ensuring consistent spacing between each rung, until you have tied all the desired ladder rungs.
By using this knotting technique, you can create secure ladder rungs that will withstand the weight and movement of anyone climbing the ladder. Take your time with each knot, ensuring it is tight and properly positioned against the main side ropes. This attention to detail will result in a sturdy and reliable rope ladder.
Attaching The Ladder Rungs To The Side Ropes
This step involves attaching the ladder rungs to the side ropes, creating a secure and functional rope ladder. It is important to follow the specific instructions to ensure stability and safety while tying the ladder.
Now that you have prepared the side ropes and ladder rungs, it’s time to attach the rungs to the ropes. This step is crucial as it determines the stability and safety of the rope ladder. Follow the steps below to achieve a secure and properly aligned ladder:
1. Start attaching the ladder rungs to the side ropes from the bottom. This method ensures that the ladder remains stable and helps distribute the weight evenly.
2. Before you start attaching the rungs, ensure that the side ropes are taut and held securely in place. This will prevent any slippage or weak spots when the ladder is in use.
3. Begin by placing the first ladder rung against the side ropes, and aligning it with the bottom of the ropes. The rung should be perpendicular to the ropes, creating a solid foundation for the ladder.
4. Secure the rung firmly to the side ropes by tying simple knots. Make sure that the knots are tight and will not come undone during use. This will ensure the ladder rungs stay in place even with repeated weight and movement.
5. Once the first rung is securely attached, move on to the next rung. Maintain proper spacing between each rung so that users can climb the ladder comfortably and with ease. A spacing of around 12 to 18 inches is recommended, but you can adjust it according to your preference.
6. Continue attaching the ladder rungs to the side ropes using the same method. It’s important to check the alignment and spacing after attaching each rung to ensure they are parallel and evenly spaced.
7. Take your time while attaching the rungs and double-check their alignment and spacing. This meticulous approach will result in a sturdy and safe rope ladder that can be confidently used for various purposes.
Remember, the quality and durability of your rope ladder depend on the care you put into attaching the ladder rungs to the side ropes. By following these steps and ensuring proper alignment and spacing, you can create a strong and reliable ladder for all your needs.
How To Tie A Rope Ladder: Assembling The Ladder
Learning how to tie a rope ladder can come in handy for various purposes, whether it’s for outdoor adventures, emergencies, or simply for fun at home. Assembling the ladder is the crucial first step in creating a sturdy and reliable rope ladder.
Gather The Ladder Materials And Tools
To assemble a rope ladder, you will need a few essential materials and tools. Before starting the process, it’s important to ensure you have everything at hand to avoid interruptions. Here’s a list of what you’ll need:
| Materials | Tools |
|---|---|
|
|
Once you have gathered all the materials and tools, you are ready to proceed with assembling the ladder.
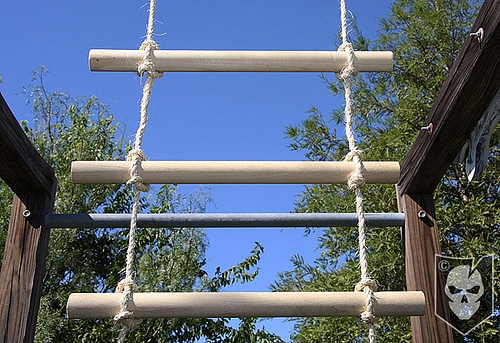
Lay Out The Side Ropes And Ladder Rungs In The Desired Configuration
The configuration of your rope ladder depends on your specific needs and preferences. You can adapt the length, width, and number of rungs to suit the intended use.
Here’s a step-by-step guide to laying out the side ropes and ladder rungs:
Step 1
Measure and cut the side ropes to the desired length, ensuring they are long enough for your ladder’s intended purpose. It’s recommended to use a strong and durable rope, such as nylon or polypropylene, for optimal strength and longevity.
Step 2
Lay the side ropes parallel to each other on a flat surface, maintaining the desired distance between them. This will create the framework for your ladder.
Step 3
Measure and mark the positions for the ladder rungs along the side ropes. The spacing between rungs can vary based on your preference, but it’s important to ensure they are evenly distributed for stability and balance.
Step 4
Attach the ladder rungs to the side ropes using either nails or screws. You can use a hammer to secure them firmly in place. If desired, you can also pre-drill holes in the rungs to prevent splitting.
Step 5
Repeat the process for each ladder rung until you have completed the desired number. Ensure that all rungs are securely fastened and evenly spaced.
By following these steps, you will successfully assemble a rope ladder, ready for use. Remember to double-check the dimensions and stability before putting your ladder to use, ensuring the safety of anyone who might climb it.
Positioning The Side Ropes
Before you start tying a rope ladder, it’s essential to position the side ropes correctly. This step involves determining the desired height and angle of the ladder and attaching the top ends of the side ropes to a secure anchor point. Follow these instructions to ensure a solid foundation for your rope ladder:
Determine The Desired Height And Angle Of The Ladder
Begin by deciding how high you want your rope ladder to be. Consider the purpose of the ladder and the height you need to reach. Whether it’s for accessing treehouses, elevated platforms, or simply for exercise, determining the appropriate height is crucial.
Next, think about the angle at which you want the ladder to lean. This primarily depends on the stability and comfort you require. A slightly slanted ladder can offer better weight distribution, making it easier to climb.
Attach The Top Ends Of The Side Ropes To A Secure Anchor Point
Once you have determined the height and angle, it’s time to secure the top ends of the side ropes. Look for a strong and stable anchor point, such as a sturdy tree branch, a securely fastened eye bolt, or a beam that can bear weight.
Ensure each side rope has an equal amount of tension and is securely tied to the anchor point, using reliable knots such as a bowline or a clove hitch.
Tip: To further enhance stability, wrap the top ends of the side ropes around the anchor point multiple times before tying the knot.
Securing The Bottom Ends Of The Side Ropes
To secure the bottom ends of the side ropes in tying a rope ladder, follow Step 2 of the process. By carefully fastening the ropes, you can ensure stability and safety in using the ladder.
Once you have successfully measured and cut the side ropes for your rope ladder, it’s time to move on to the next crucial step – securing the bottom ends of the side ropes. This step is essential because it prevents any shifting or movement of the ladder, ensuring your safety and stability while using it.
Tying or anchoring the bottom ends of the side ropes is a straightforward process that requires a few simple techniques. Here’s how you can get it done:
Tying The Bottom Ends
The first method to secure the bottom ends of the side ropes is by tying a strong knot. Start by doubling up the rope and create a loop. Pass the loop through the last rung or step of the ladder, making sure it is tight enough to hold the weight that will be applied to the ladder.
Anchoring The Bottom Ends
Another effective method to prevent shifting or movement is by anchoring the bottom ends of the side ropes. To do this, you should find a sturdy anchor point nearby. This could be a tree, a pole, or any other fixed object that can support the weight and tension of the ladder.
Once you have identified a suitable anchor point, wrap the bottom ends of the side ropes tightly around it. Make sure to create several wraps for added stability.
Use a secure locking knot, such as a clove hitch or a double half-hitch, to fasten the ropes securely to the anchor point. This will provide the necessary stability and prevent any unwanted movement while using the ladder.
Remember to inspect the knots or anchor points for any signs of slippage or weakness before using the rope ladder. It is crucial to ensure that everything is securely fastened to guarantee your safety and stability.
By tying or anchoring the bottom ends of the side ropes, you can rest assured that your rope ladder will stay firmly in place, providing you with a reliable means of accessing higher areas.
Take the time to check and recheck the knots or anchor points to be certain that everything is solid and secure. With these precautions in place, you can confidently climb your ladder and tackle those hard-to-reach spots without any worries.
How To Tie A Rope Ladder: Safety And Testing
When it comes to using a rope ladder, safety should always be your top priority. Before attempting to climb a rope ladder, it is crucial to conduct thorough safety checks to ensure its stability. Additionally, testing the ladder’s strength before regular use is essential to prevent any accidents.
Conduct Thorough Safety Checks Before Climbing The Ladder
Before you start using a rope ladder, it’s crucial to inspect the ladder thoroughly. Take the time to check every component, including the ropes, rungs, connectors, and anchor points. Look for any signs of wear and tear, such as frayed ropes or damaged rungs.
Make sure all knots and connections are secure and properly tightened. Any loose or damaged parts should be repaired or replaced before use. Remember, compromising on safety can lead to serious injuries or accidents.
Here are a few additional safety checks to keep in mind:
- Ensure the ladder is free from any obstructions or entanglements, such as branches or debris.
- Verify that the ladder is securely attached to a stable and strong anchor point.
- Inspect the surrounding area for potential hazards, such as sharp edges or slippery surfaces.
- If the ladder has been stored for a long time, check for signs of rot or degradation.
Test The Ladder’s Stability And Strength Before Regular Use
Testing the stability and strength of your rope ladder is essential to ensure its reliability. Performing these tests will give you confidence in the ladder’s ability to support your weight and keep you safe while climbing.
Here are the testing procedures:
- Load Testing: Apply gradual weight to the ladder to simulate climbing conditions. Start with a lighter load and gradually increase the weight to check if the ladder remains stable.
- Side-to-Side Stability: Gently sway the ladder from side to side to evaluate its stability. If the ladder wobbles excessively or feels unstable, consider reinforcing the anchor points or adjusting the ladder’s setup.
- Rung Strength: Test the strength of each rung by applying pressure or standing on them one by one. Ensure they can support your weight without any signs of bending or breaking.
Remember, rope ladders are not designed for heavy-duty use or prolonged exposure to the elements. Regularly check and maintain your rope ladder to keep it in optimal condition.
Inspecting The Rope Ladder
Before using a rope ladder, it is crucial to inspect it thoroughly for any signs of damage or weakness. By performing a detailed inspection, you can ensure that the rope ladder is safe to use and reliable in supporting your weight.
In this step, I will cover two essential aspects of inspecting a rope ladder: checking for visible damage, fraying, or weak spots in the ladder ropes, and verifying the tightness and security of the knots or attachments.
Check For Any Visible Damage, Fraying, Or Weak Spots In The Ladder Ropes
Begin by visually examining the ladder ropes from top to bottom. Look for any fraying, breakage, or signs of wear and tear along the entire length of the ropes. Pay close attention to areas where the ropes are attached to the ladder steps or any other hardware.
If you spot any visible damage such as cuts, tears, or loose threads, it is essential to replace the ladder or seek professional assistance in repairing it.
Additionally, check for weak spots that may compromise the ladder’s strength. These weak spots could result from knots in the rope or areas where the rope has been repeatedly strained. If you notice any weak spots, it is advisable to reinforce or replace the affected section of the ladder ropes.
Verify The Tightness And Security Of The Knots Or Attachments
The next step in inspecting the rope ladder is to examine the tightness and security of the knots or attachments. Gently tug on each knot, ensuring they are tightly secured and show no signs of slipping or unraveling. Pay special attention to knots used for securing the ladder steps or any additional attachments.
If you come across any loose knots, it is crucial to retie them properly before using the rope ladder. Remember, a secure knot is essential for maintaining the ladder’s stability and preventing accidents while climbing.
In case you are uncertain about knotting techniques, it is advisable to seek guidance from experts or refer to reliable resources that provide detailed instructions on knot tying.
Inspecting a rope ladder thoroughly can help ensure your safety during its use. By checking for visible damage, fraying, or weak spots in the ladder ropes and verifying the tightness and security of the knots or attachments, you can have peace of mind knowing that your rope ladder is in excellent condition and ready for use.
Testing The Ladder Stability
In Step 2 of tying a rope ladder, it is crucial to test the ladder’s stability. This ensures safety and reliability when using the ladder.
Once you have successfully tied the rope ladder following the instructions in Step 1: Tying the Rope Ladder, it is crucial to test the ladder’s stability before using it.
Apply Weight Or Pressure On Each Ladder Rung To Ensure It Can Support The Intended Load
The first way to test the stability of your rope ladder is by applying weight or pressure on each ladder rung. This step ensures that the ladder can support the intended load and withstand the weight of the climbers.
|
Shake Or Move The Ladder To Test Its Stability And Overall Structural Integrity
Another crucial step in testing the ladder’s stability is to shake or move the ladder gently. This step helps assess the overall structural integrity of the ladder and ensures it can withstand movement.
- Hold onto the sides of the ladder firmly.
- Gently shake the ladder from side to side and forward and backward.
- Pay close attention to any excessive movement, swaying, or looseness.
- If the ladder feels unstable or wobbly, it is essential to re-evaluate the knot tying and make necessary adjustments to enhance the ladder’s stability.
By following these steps, you can ensure the stability and structural integrity of your rope ladder. Remember, safety should always be the top priority when using any type of ladder. Taking the time to test the ladder’s stability ensures a secure and reliable climbing experience.
Credit: www.artofmanliness.com
Frequently Asked Questions For How To Tie A Rope Ladder
How Do You Tie A Simple Rope Ladder?
To tie a simple rope ladder, first collect two rope lengths of equal size. Next, space out the rungs evenly along one of the ropes. Then, tie each rung tightly to the second rope using a square knot. Finally, secure the ends of the ladder to a solid support structure.
How Do You Stabilize A Rope Ladder?
To stabilize a rope ladder, ensure it is securely anchored at the top and bottom. Use sturdy supports and fasten them tightly. Make sure the ladder is straight, avoiding any twisting or sagging. Regularly inspect and maintain its stability for safe use.
What Is The Best Rope For A Rope Ladder?
The best rope for a rope ladder is typically a strong and durable material like nylon or polypropylene. These ropes offer good strength and resistance to wear and tear. It is important to choose ropes that have the appropriate thickness and load capacity for your ladder’s intended use.
What Is The Best Knot For A Ladder?
The best knot for a ladder is the square knot. It is secure, easy to tie, and widely used for joining ropes.
How To Tie A Rope Ladder Securely?
To tie a rope ladder securely, start by attaching the ladder securely to a stable anchor point and ensure each rung is tightly secured.
What Type Of Rope Is Best For A Rope Ladder?
The best type of rope for a rope ladder is a strong and durable nylon rope that can support the weight of the user.
How Many Rungs Should A Rope Ladder Have?
A standard rope ladder typically has about 8 to 12 rungs, but the number of rungs can vary depending on your specific needs.
Final Words
Mastering the art of tying a rope ladder is a valuable skill that can come in handy in various situations. By following these step-by-step instructions, you can confidently and efficiently create your rope ladder. Whether you need it for recreational activities, DIY projects, or emergencies, this versatile tool can be a lifesaver.
So, grab your ropes, practice your knots, and elevate your ladder-tying skills today!