To replace an attic ladder hinge arms, start by removing the screws securing the arms to the ladder. Then, install the new arms by attaching them with screws, ensuring they are securely fastened.
Finally, test the ladder to ensure it functions properly.
Understanding Attic Ladder Hinge Arms
Attic ladder hinge arms are an essential component of any attic ladder. They provide stability and support when opening and closing the ladder, making it safe and convenient to access your attic space.
Understanding the different types of attic ladder hinge arms, as well as why and when you may need to replace them, is key to maintaining the functionality of your attic ladder.
In this article, we will delve into the topic of attic ladder hinge arms, providing you with the information you need to make informed decisions about your ladder’s maintenance and repair.
Different Types Of Attic Ladder Hinge Arms
Attic ladder hinge arms come in various types, each designed to accommodate different types of attic ladders. The most common types include:
| Type | Description |
|---|---|
| Tubular Steel Hinge Arms | These hinge arms are made of sturdy tubular steel and are often used in heavy-duty attic ladders. They provide excellent support and durability. |
| Aluminum Hinge Arms | Aluminum hinge arms are lightweight and rust-resistant, making them suitable for attic ladders in areas with high humidity. |
| Plastic Hinge Arms | Plastic hinge arms are commonly used in lightweight attic ladders. They are affordable and easy to replace. |
Why And When You Need To Replace Them
Over time, attic ladder hinge arms may wear out or become damaged, compromising the stability and safety of your ladder. Here are some reasons why you may need to replace them:
- The hinge arms are bent or warped, affecting the smooth operation of the ladder.
- There is excessive rust or corrosion on the hinge arms, weakening their structural integrity.
- The plastic hinge arms have become brittle and are at risk of breaking.
- One or more hinge arms have completely broken or detached from the ladder.
By regularly inspecting and maintaining your attic ladder hinge arms, you can identify signs of damage and replace them promptly to prevent accidents and ensure the continued functionality of your attic ladder.
Assessing The Condition Of Your Attic Ladder Hinge Arms
Before embarking on the task of replacing your attic ladder hinge arms, it is crucial to assess their condition accurately. By efficiently inspecting these hinge arms, you can identify any signs of wear and damage, ensuring that your replacement is not only timely but also prevents any potential accidents or injuries.
Signs Of Wear And Damage
Maintaining a safe and sturdy attic ladder is essential for the smooth functioning of your home. Over time, the hinge arms of your attic ladder may undergo wear and tear due to constant use and exposure to various elements. To determine whether your hinge arms need replacement, watch out for the following signs of wear and damage:
- Visible rust or corrosion: Inspect the hinge arms thoroughly for any signs of rust or corrosion. These can weaken the overall structure and compromise the ladder’s stability.
- Loose or wobbly hinge arms: If you notice excessive movement or a wobbly feel when climbing up or down your attic ladder, it could indicate that the hinge arms are loose or damaged.
- Cracked or bent hinge arms: Carefully examine the hinge arms for any cracks or visible bending. Such damage can render the ladder unsafe and necessitate immediate replacement.
- Excessive squeaking or creaking: If your attic ladder produces loud, persistent squeaking or creaking noises during usage, it may indicate worn-out hinge arms. Ignoring this can lead to further deterioration and potential accidents.
Tools Needed For Inspection
To perform a thorough inspection of your attic ladder hinge arms, gather the following essential tools:
| Tools | Purpose |
|---|---|
| Flashlight | Provides additional visibility in the attic space, enabling a detailed examination of the hinge arms. |
| Ladder | Allows safe access to the attic for closer inspection of the hinge arms. |
| Screwdriver | Useful for removing screws or fasteners to access the hinge arms during the inspection process. |
| Gloves | Ensure safety and protect your hands while handling the ladder and examining the hinge arms. |
| Plumb Bob | Enables you to check if the hinge arms are aligned correctly and positioned vertically. |
By having these tools readily available, you’ll be equipped to thoroughly inspect your attic ladder hinge arms, detect any signs of wear or damage, and proceed with the necessary replacement with confidence.
Removing The Old Attic Ladder Hinge Arms
Learn how to easily replace the hinge arms on your attic ladder and remove the old ones. Follow these steps for a smooth and efficient process.
Step 1: Safety Precautions
Before you begin removing the old attic ladder hinge arms, it’s important to prioritize safety. Attic spaces can be hazardous and accidents can occur if proper precautions are not taken. Here are a few safety measures to keep in mind:
- Wear protective gear, including gloves and goggles, to prevent injuries.
- Use a stable ladder to access the attic and ensure it is firmly secured.
- Clear the area around the attic access opening to provide enough space to work comfortably.
- Ensure proper lighting is available in the attic.
- Be cautious of any potential electrical wiring or plumbing that may be present in the vicinity.
Step 2: Detaching The Ladder From The Attic Access Opening
- Position a sturdy chair or ladder beneath the attic ladder to support its weight.
- Locate the hinge arms that connect the ladder to the attic access opening.
- Using a screwdriver or a wrench, carefully remove the screws or bolts securing the hinge arms to the attic access opening. Keep these screws or bolts in a safe place as you may need them later.
- Have someone hold the ladder in place from below, ensuring it doesn’t fall or cause any accidents while you work.
- Slowly lower the ladder down onto the chair or ladder, ensuring it is stable and doesn’t topple over.
Step 3: Removing The Hinge Arms
- Inspect the hinge arms to determine how they are attached to the ladder itself.
- Using a screwdriver or a wrench, carefully remove the screws or bolts securing the hinge arms to the ladder. These screws or bolts may be located on the sides or underneath the ladder.
- Once the screws or bolts are removed, gently detach the hinge arms from the ladder.
- Repeat the process for each hinge arm until all of them have been removed.
It’s important to handle the old hinge arms with care, as they may be sharp or rusted. Properly dispose of them to avoid any injuries. Congratulations! You have successfully removed the old attic ladder hinge arms. In the next section, we will explore how to install the new hinge arms for your attic ladder.
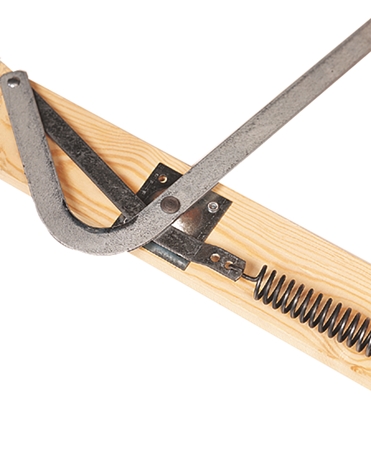
Image from: Louisville ladder
Choosing The Right Replacement Hinge Arms
When it comes to replacing the hinge arms of your attic ladder, choosing the right ones is crucial. The hinge arms play a critical role in the stability and functionality of the ladder, so it’s important to select the correct ones that are compatible with your ladder model. In this section, we will discuss the factors to consider when selecting hinge arms and how to measure for the correct size.
Factors To Consider When Selecting Hinge Arms
Before purchasing replacement hinge arms, there are a few factors you should keep in mind to ensure the utmost compatibility and performance. Here are some essential considerations:
- Brand and Model: Each attic ladder comes with a specific brand and model number. It is crucial to select hinge arms that are specifically designed for your ladder model. Using incompatible hinge arms can compromise the safety and functionality of your ladder.
- Material: Hinge arms are typically made of durable materials like steel or aluminum. The material you choose depends on your preferences and budget. Steel hinge arms offer excellent strength and durability, while aluminum hinge arms are lightweight and corrosion-resistant.
- Weight Capacity: Different attic ladders have different weight capacities. It is essential to check the weight capacity of your ladder and ensure that the replacement hinge arms can support the same or higher weight. Using hinge arms with a lower weight capacity can lead to accidents and ladder failure.
- Adjustability: Some hinge arms offer adjustable features that allow you to customize the ladder’s angle and position. This can be beneficial if you have specific requirements or limitations in your attic space.
How To Measure For The Correct Size
Measuring for the correct size of hinge arms is crucial to ensure a proper fit and seamless replacement. Follow these simple steps to measure for the correct size:
- Remove the old hinge arms: Begin by removing the old hinge arms from your attic ladder. Carefully detach them, taking note of any specific instructions or mechanisms.
- Measure the length: Take a tape measure and measure the length of the old hinge arms from end to end. Make sure to include any additional hook or attachment points in your measurement.
- Check the width and hole spacing: Measure the width of the hinge arms and the distance between the screw holes. These measurements are crucial to ensure that the replacement hinge arms align perfectly with the ladder brackets.
- Verify the hinge type: Different attic ladder models use different types of hinge arms. Check the type of hinge arms you need, whether it’s a pivotal hinge, telescopic hinge, or other variations.
- Consult the manufacturer: If you are unsure about the measurements or the specific hinge arms you need, it is always recommended to consult the manufacturer or refer to the ladder’s user manual for accurate information.
By considering these factors and accurately measuring for the correct hinge arm size, you can ensure a seamless replacement process that enhances the safety and functionality of your attic ladder. Take your time to research and choose the appropriate hinge arms that match your ladder model, weight capacity, and adjustability requirements.
Installing The New Attic Ladder Hinge Arms
Learn how to easily replace your attic ladder hinge arms with step-by-step instructions in this helpful guide. Enhance the functionality of your attic ladder by installing new hinge arms for smoother and safer access.
When it’s time to replace the hinge arms on your attic ladder, the installation process might seem daunting at first. But with the right tools and a step-by-step approach, you can get the job done efficiently and effectively.
In this section, we’ll guide you through the process of installing the new attic ladder hinge arms, ensuring a secure and reliable connection.
Follow these three simple steps to successfully complete this task.
Step 1: Preparing The Ladder For Installation
To begin the installation process, you’ll first need to prepare your ladder. Start by carefully lowering the existing ladder to its fully extended position. Take note of the old hinge arms and how they are attached to the ladder.
Then, use a wrench or screwdriver to loosen and remove the screws or bolts securing the old hinge arms. Once the old hinge arms are removed, inspect the ladder for any damage or wear that may require repair before proceeding further.
Step 2: Attaching The Hinge Arms
With a new set of hinge arms in hand, it’s time to attach them to your attic ladder. Start by positioning the hinge arms on either side of the ladder, ensuring they align with the existing holes or markings.
Use screws or bolts to secure the hinge arms in place, tightening them just enough to hold the arms firmly against the ladder.
Take care not to overtighten, as this could strip the threads or damage the ladder. Repeat this process for both hinge arms, ensuring they are securely fastened.
Step 3: Reinforcing The Connection
Now that the new hinge arms are attached, it’s important to reinforce the connection for added stability. One way to do this is by using metal brackets or braces. Position a bracket or brace on each side of the hinge arms, aligning them with the ladder and hinge arm holes.
Secure the brackets or braces using screws or bolts, ensuring a tight and secure fit. This additional reinforcement will help distribute the weight and stress evenly, minimizing the risk of future hinge arm failure.
By following these three steps, you can easily install new attic ladder hinge arms and restore the functionality and safety of your attic access.
Remember to always prioritize safety while working at heights and consult the manufacturer’s instructions for specific guidance on your attic ladder model. With the installation complete, you can now confidently and safely access your attic whenever needed.
Frequently Asked Questions On How To Replace An Attic Ladder Hinge Arms
How Do You Tighten An Attic Ladder?
To tighten an attic ladder, follow these simple steps:
1. Inspect the ladder for any loose screws or bolts.
2. Use a wrench or screwdriver to tighten them securely.
3. Check the hinges and brackets for any signs of wear or damage.
4. If needed, replace them with new ones.
5. Double-check all connections and ensure the ladder is stable before use.
How Long Does It Take To Replace An Attic Ladder?
Replacing an attic ladder typically takes around 2-4 hours, depending on the complexity of the installation. It involves removing the old ladder, preparing the opening, and installing the new ladder. Professional assistance is recommended for a safe and efficient replacement process.
What Is The Pull-Down Ladder In Attic Called?
The pull-down ladder in the attic is commonly referred to as an attic ladder. It is a retractable staircase that provides easy access to the attic space.
How Do I Keep My Attic Door Closed?
To keep your attic door closed, consider these options:
1. Install a latch or lock system on the door for added security.
2. Use a doorstop or wedge to prevent the door from opening.
3. Check for any gaps or drafts and seal them with weatherstripping or caulk.
4. Ensure the hinges are tight and functioning properly.
5. Store any heavy objects in front of the door as an extra deterrent.
How Do I Know If My Attic Ladder Hinge Arms Need Replacing?
If you suspect that your attic ladder hinge arms may need replacing, there are a few signs to look out for.
Here are some indicators that your attic ladder hinge arms might be in need of replacement:
Visible damage: Inspect the hinge arms for any visible signs of damage, such as cracks, bends, or rust. These can indicate that the hinge arms are weakened and may need to be replaced.
Difficulty opening or closing: If you find it increasingly difficult to open or close your attic ladder, it could be a sign that the hinge arms are worn out or damaged.
Instability or wobbling: When climbing up or down the attic ladder, if you notice any instability or wobbling, it could mean that the hinge arms are not providing proper support and should be replaced.
Age and wear: If your attic ladder is old and has been used frequently over the years, it’s possible that the hinge arms have simply worn out due to normal wear and tear. In this case, it is a good idea to consider replacing them.
Professional inspection: If you’re unsure about the condition of your attic ladder hinge arms, it may be wise to have a professional inspect them. They can provide expert advice on whether replacement is necessary.
Remember, safety is paramount when it comes to attic ladders. If you have any concerns about the condition of your hinge arms or overall ladder stability, it’s best to err on the side of caution and have them
What Tools Do I Need To Replace Attic Ladder Hinge Arms?
To replace attic ladder hinge arms, you will need the following tools:
1. Screwdriver: A screwdriver will be needed to remove any screws holding the old hinge arms in place.
2. Wrench or pliers: You may need a wrench or pliers to remove any nuts or bolts that are securing the hinge arms.
3. Replacement hinge arms: Make sure you have the correct replacement hinge arms for your specific attic ladder model.
4. Safety equipment: It is always a good idea to wear safety goggles and gloves when working with tools.
5. Ladder: You will need a ladder to access the attic and safely work on replacing the hinge arms.
Before starting any project, it is important to read and follow the manufacturer’s instructions for your specific attic ladder model. If you are unsure about any step of the process, it may be best to consult a professional or handyman for assistance. Safety should always be a top priority when working on any home improvement project.
Can I Replace The Attic Ladder Hinge Arms Myself Or Do I Need Professional Help?
Replacing attic ladder hinge arms can be a DIY project if you are comfortable using basic tools and following instructions. You can certainly replace the attic ladder hinge arms yourself if you feel comfortable with DIY projects and have the necessary tools.
However, working with ladders can be dangerous, so if you’re not experienced or confident in your abilities, it may be best to seek professional help.
Additionally, if your attic ladder is under warranty, attempting the repair yourself could potentially void the warranty. If you do decide to tackle the project yourself, make sure to follow all manufacturer instructions and safety precautions.
Final Thought
Replacing an attic ladder hinge arm is a manageable task that can enhance safety and convenience in accessing your attic space. By following the step-by-step instructions outlined, you’ll be able to replace the hinge arms with ease.
Remember to prioritize safety precautions and use the necessary tools. With a little patience and effort, you’ll have a sturdy and functional attic ladder in no time. Enjoy your hassle-free attic access!