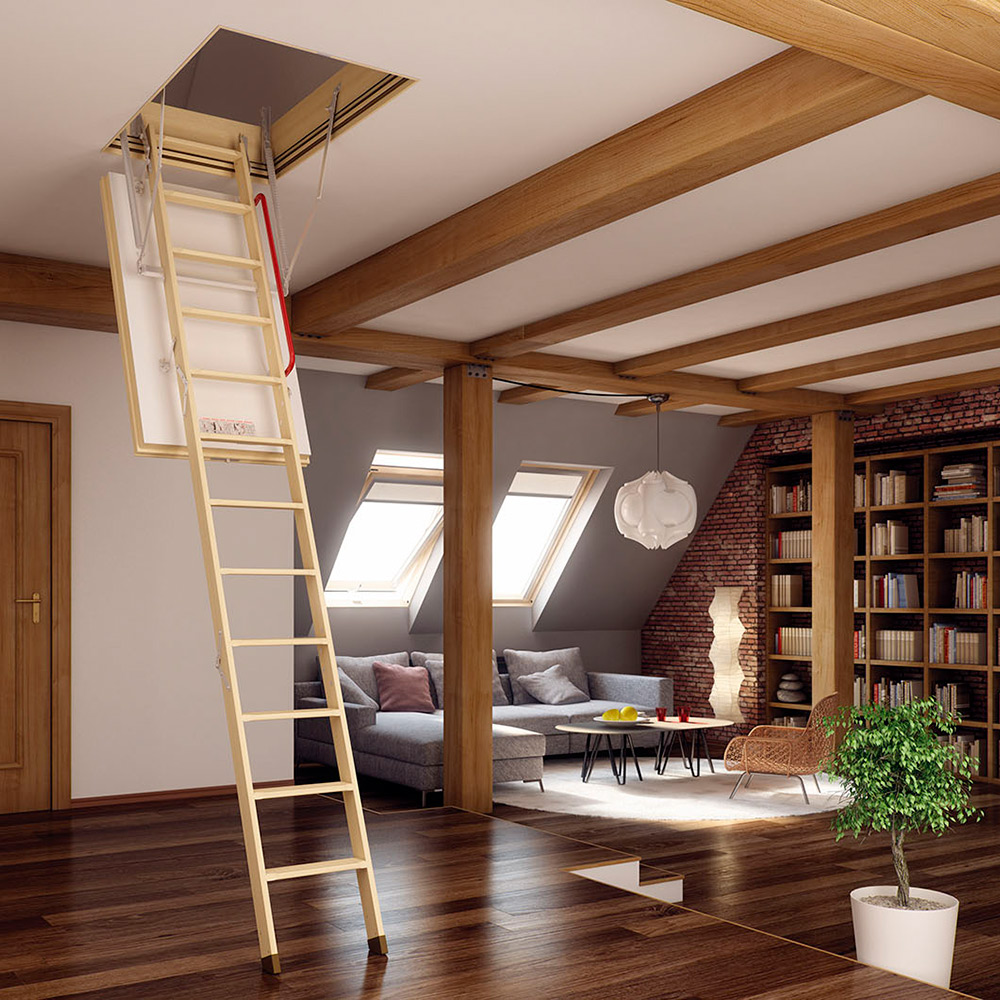
To replace a drop-down attic ladder, start by removing the old ladder and any hardware attached to it. Then, measure the dimensions of the existing opening and purchase a new ladder that fits those dimensions.
Install the new ladder according to the manufacturer’s instructions.
Why Replace Your Drop-down Attic Ladder
Replacing your drop-down attic ladder is a smart decision that brings several benefits. From ensuring safety to improving functionality and enhancing energy efficiency, there are compelling reasons to invest in a new attic ladder. This blog post will delve into the key reasons why replacing your drop-down attic ladder is a wise choice.
Safety Concerns With Old Or Damaged Ladders
One of the most important reasons to replace your drop-down attic ladder is to address safety concerns associated with old or damaged ladders. Over time, attic ladders can become worn out, corroded, or lose their structural integrity.
This poses a significant risk that can result in accidents and injuries. By replacing your old or damaged ladder, you can ensure the safety of yourself and your household members.
Improved Functionality And Accessibility
A new drop-down attic ladder can provide improved functionality and accessibility to your attic space. Older ladders may have outdated mechanisms or designs that make them difficult to operate.
By upgrading to a modern attic ladder, you can enjoy easier and smoother access to your attic. This is especially beneficial if you frequently use your attic for storage or as an additional living space.
Moreover, newer attic ladder models often come with additional features such as handrails, wider steps, and slip-resistant treads, further enhancing the user experience. These improvements not only make accessing your attic safer but also more convenient and comfortable.
Enhancing Energy Efficiency And Insulation
Another compelling reason to replace your drop-down attic ladder is to enhance energy efficiency and insulation in your home.
Older ladders may have gaps or cracks that allow air leakage, resulting in energy loss and increased utility bills. By installing a new and properly sealed attic ladder, you can prevent air drafts and maintain better control over your home’s temperature.
In addition, modern attic ladder designs often incorporate insulation within the ladder itself or provide options for insulating covers. This added insulation helps to prevent heat transfer between your living spaces and the attic, improving energy efficiency and reducing the strain on your heating and cooling systems.
Replacing your drop-down attic ladder is a proactive step that ensures safety, improves functionality and accessibility, and enhances energy efficiency in your home.
By addressing safety concerns, enjoying easier access to your attic, and saving on energy costs, investing in a new attic ladder proves to be a valuable upgrade for any homeowner.
Credit: www.homedepot.com
Choosing the Right Replacement Ladder
The right replacement ladder is essential when it comes to upgrading your drop-down attic ladder. It ensures safety, durability, and ease of use, making your attic easily accessible.
Since there are various options available in the market, choosing the right replacement ladder can be overwhelming. However, by considering a few key factors, you can make an informed decision that meets your specific needs and requirements.
Assessing Weight Capacity And Ladder Dimensions
Before purchasing a replacement ladder, it is crucial to assess its weight capacity and dimensions. Taking these factors into consideration ensures that the ladder can safely support you as you access your attic and that it fits within the available space.
To determine the weight capacity, refer to the manufacturer’s specifications which are usually provided in the product description or on the packaging.
Look for a ladder that has a weight capacity suitable for your specific needs, taking into account any items you may need to carry into or out of the attic.
In addition to weight capacity, you also need to assess the ladder dimensions to ensure it fits your attic space. Measure the available opening in your ceiling and compare it to the ladder’s dimensions, typically indicated as the rough opening size.
Choose a ladder that can be easily installed within the existing opening, without requiring any major modifications or alterations. This will help you avoid additional expenses and save time during the installation process.
Considering Materials And Construction
The materials and construction of the replacement ladder play a vital role in its durability and longevity. Opting for a ladder made from high-quality materials ensures it can withstand regular use and hold up well over time.
Generally, ladders are available in aluminum, wood, and steel options. Aluminum ladders tend to be lightweight and resistant to corrosion, making them a popular choice.
Wood ladders offer a classic aesthetic appeal and can be painted or stained to match your attic decor. Steel ladders provide sturdy support and are highly durable.
Moreover, pay attention to the ladder’s construction. Look for features such as reinforced steps or rungs, secure hinges, and stable support brackets.
These elements contribute to the ladder’s overall strength and stability. Taking into account the weight capacity and the materials, choose a ladder that is designed to withstand the wear and tear of regular use for years to come.
Evaluating Ease Of Installation
The ease of installation is another important factor to consider when choosing a replacement ladder. A ladder that is easy to install not only saves time but also reduces the effort required. Look for ladders that come with clear and detailed installation instructions.
Additionally, consider the installation method itself. Some ladders require minimal assembly and can be easily installed by one person, while others may require assistance or professional installation. Evaluating the ease of installation ensures a smooth and stress-free process.
Furthermore, it is also valuable to assess any additional features that aid in ease of use. For example, certain replacement ladders may come with handrails for added stability or anti-slip steps for enhanced safety. These features can make accessing and using your attic ladder more convenient and secure.
Preparing for Replacement
Before replacing a drop-down attic ladder, it is essential to take the necessary steps to prepare for the project. This includes clearing the attic space, gathering the required tools and materials, and measuring and adjusting the opening if needed. By properly preparing for the replacement, you can ensure a smooth and efficient process from start to finish.
Clearing The Attic Space
Before you can begin the process of replacing the attic ladder, it is crucial to clear the attic space of any obstructions. Remove any items or debris that may obstruct your work area and make it difficult to install the new ladder properly.
It is recommended to store any belongings in a safe, temporary location to avoid any damage during the replacement process.
Gathering Necessary Tools And Materials
Having the right tools and materials on hand is essential for a successful attic ladder replacement. Here is a list of the items you will need:
| Power drill |
| Tape measure |
| Level |
| Hammer |
| Screwdriver |
| Construction adhesive |
| New attic ladder kit |
Make sure you have all these tools and materials ready before starting the project. This will save you time and avoid any unnecessary delays due to missing items.
Measuring And Adjusting The Opening If Needed
Before installing the new attic ladder, it is important to measure the opening to ensure a proper fit. Use a tape measure to record the dimensions of the current opening. Compare these measurements to the specifications provided by the manufacturer of the new ladder kit.
If any adjustments need to be made to the opening, such as widening or lengthening, make the necessary modifications using appropriate tools. Always follow the manufacturer’s instructions for adjusting the opening to ensure a safe and secure installation.
Step-by-step Installation Guide
Replacing a drop-down attic ladder can be a straightforward process if you follow the right steps. In this step-by-step installation guide, I will walk you through the process of removing the existing ladder, installing the new ladder, and adjusting and securing the ladder frame. Let’s get started!
Removing The Existing Ladder
Before you begin, make sure to gather the necessary tools for the job. You’ll need a screwdriver, pliers, a utility knife, and a tape measure. Once you have everything ready, follow these steps to remove the existing ladder:
- Start by closing and securing the ladder in its folded position.
- Locate the brackets or hinges that attach the ladder to the attic opening.
- Using your screwdriver, remove the screws or bolts that secure the ladder to the brackets or hinges.
- Once the ladder is detached, carefully lower it down to the floor.
- Inspect the attic opening to ensure there are no obstructions or damages that need to be addressed before installing the new ladder.
Installing The New Ladder
Now that you have successfully removed the old ladder, it’s time to install the new one. Follow these steps to safely and securely install the new drop-down attic ladder:
- Measure the dimensions of the attic opening to ensure a proper fit for the new ladder.
- Carefully unpack the new ladder, taking care not to damage any of its components.
- Position the ladder frame in the attic opening, aligning it with the edges.
- Secure the ladder frame to the surrounding structure using the provided screws or bolts.
- Refer to the manufacturer’s instructions to attach any additional brackets or supports that may be required.
Adjusting And Securing The Ladder Frame
After the new ladder is securely installed, it’s important to adjust and secure the ladder frame to ensure safe usage. Follow these steps to complete the installation:
- Carefully extend the ladder to its fully open position.
- Check for any misalignment or unevenness and adjust the ladder frame as needed.
- Secure the ladder frame by tightening any loose screws or bolts.
- Ensure that the ladder operates smoothly, without any sticking or wobbling.
- Inspect the ladder hinges, springs, and other components for proper functioning.
Congratulations! You have successfully replaced your drop-down attic ladder. Now you can enjoy easy access to your attic whenever needed. Remember to always prioritize safety and follow the manufacturer’s instructions throughout the installation process.
Troubleshooting And Maintenance Tips
Learn how to replace a drop-down attic ladder with these troubleshooting and maintenance tips for a hassle-free experience. Discover step-by-step instructions and helpful advice to ensure a smooth installation process.
Addressing Common Installation Issues
Replacing a drop-down attic ladder can sometimes be a challenging task, especially if you encounter common installation issues. By addressing these issues, you can ensure a smooth and successful replacement process.
An important aspect to consider is the size of the ladder opening. Make sure that the attic ladder you purchase is the correct size for the opening in your ceiling. It should fit securely and snugly, without any gaps.
If you find that the ladder is wobbly or unstable after installation, check the fasteners and brackets. Tighten any loose connections and ensure that the ladder is securely anchored to the ceiling joists. This will provide stability and prevent any accidents or injuries.
Maintaining Proper Lubrication And Hinge Functionality
Proper lubrication and hinge functionality play a significant role in ensuring the smooth operation of a drop-down attic ladder. Regular maintenance in this regard can extend the lifespan of your ladder and prevent unnecessary wear and tear.
You should lubricate the hinges at least once a year. Apply a silicone-based lubricant to the hinge points and moving parts. This will keep the ladder folding and unfolding smoothly, reducing friction and preventing any squeaking or binding.
Regularly inspect the hinge screws for any signs of rust or corrosion. If you notice any damage, replace the screws with stainless steel ones to prevent further deterioration.
Inspecting And Replacing Any Damaged Components
Inspecting your drop-down attic ladder regularly is crucial for identifying and addressing any damaged components. This proactive approach will ensure the safety and functionality of the ladder.
Check the ladder steps for any cracks, splits, or signs of wear. If you notice any damage, it’s important to replace the affected steps promptly. This will prevent any accidents and maintain the ladder’s integrity.
Similarly, examine the ladder strings or ropes for fraying or signs of weakness. If the ropes show any signs of deterioration, it’s essential to replace them. Ensure that the replacement ropes are of the same length and thickness as the original ones.
| Component | Inspection | Replacement |
|---|---|---|
| Ladder Steps | Check for cracks, splits, or wear | Replace affected steps promptly |
| Ladder Strings or Ropes | Inspect for fraying or weakness | Replace if signs of deterioration are present |
By following these troubleshooting and maintenance tips, you can ensure that your drop-down attic ladder operates smoothly, safely, and efficiently. Regular inspections and proactive maintenance will help prolong the lifespan of the ladder, providing you with convenient access to your attic for years to come.
Frequently Asked Questions On How To Replace A Drop-Down Attic Ladder
How Do You Measure For An Attic Ladder Replacement?
To measure for an attic ladder replacement, follow these steps:
1. Measure the width and length of the opening in the ceiling.
2. Determine the rough opening height by measuring from the ceiling to the floor.
3. Take note of any obstructions, such as pipes or wires, that may affect the ladder installation.
4. Consider weight capacity and choose a ladder that meets your needs.
5. Follow the manufacturer’s instructions for installation and safety precautions.
How Long Does It Take To Replace An Attic Ladder?
Replacing an attic ladder typically takes about 2 to 4 hours. The exact time may vary depending on the complexity of the installation and any additional adjustments needed. However, hiring a professional can ensure a quicker and more efficient process.
What Is The Pull-Down Ladder In Attic Called?
The pull-down ladder in an attic is called an attic ladder. It allows easy access to the attic space.
How Much Does A Pull-Down Attic Ladder Cost?
The cost of a pull-down attic ladder varies, but it typically ranges from $100 to $400.
How Do I Choose The Right Attic Ladder Replacement?
To choose the right attic ladder replacement, measure the height, width, and clearance space in your attic.
Can I Replace My Drop-down Attic Ladder Myself?
Yes, you can replace your drop-down attic ladder yourself if you have basic DIY skills and follow the manufacturer’s instructions carefully.
What Tools Do I Need To Replace A Drop-down Attic Ladder?
You will need a tape measure, drill, level, screwdriver, and a helper to safely install a drop-down attic ladder.
Final Words
With these step-by-step instructions, replacing a drop-down attic ladder can be a seamless task. By carefully planning, measuring, and assembling the new ladder, you can ensure a safe and efficient installation. Remember to prioritize safety and seek professional assistance if needed.
With a new ladder in place, you’ll have easy access to your attic and enjoy the benefits of a well-functioning home improvement. Take control of your attic space today!